
I've been cooking and baking since I was younger than ten, making Christmas cookies with Mom. And I've made lots of homemade bread that was pretty good.
But most of the time, my bread was not as good as I expected it to be. It was not like the stuff of legend. It was not like the loaves at Blue Ribbon Bakery in New York, or Poulaine in Paris. Or even La Brea Bakery of LA. And especially, I couldn't get that delicate crisp crust.
When my son was visiting, he made bread for us and it was amazing. He sent me the recipe, which was originally that of Jim Lahey of Sullivan Street Bakery in New York City, and published in the New York Times by food writer Mark Bittman.
At first I thought - this is completely wrong. There's not enough yeast, too much water, and it's baked inside a pot with a lid on it! And it takes a whole day to make!
My American son, who now lives in a foreign land - does not use our conventional American volume-based measuring system . Instead he uses a weight-based system, in grams. (Fortunately, he bought a scale for us while he was visiting.) For those who, like me, prefer
But here is his bread recipe. It's so easy you should give it a try.
INGREDIENTS
400 grams bread flour - or 2 1/2 cups
350 grams cold water - or 1 1/2 cups
1/4 tsp yeast
1 1/2 tsp kosher salt
EQUIPMENT
Heavy oven-proof casserole or Dutch oven, enameled cast iron, ceramic, or Corning Ware, with a cover.
Mix the dry ingredients in a bowl and add the water. Mix the dough thoroughly, scraping the sides of the bowl. It will be gooey.

Cover the bowl with plastic wrap and let it sit for 12 - 18 hours.
Turn it out on a welll-floured surface - I used my cutting board with a Silpat mat on top, well-sprinkled with flour. It will be a gloppy blob. The recipe advises you use a rubber spatula to scrape all the dough out of the bowl, but I found that it all hung together in a soft elastic mass.
The recipe says to sprinkle the dough with flour and fold it over on itself a few times. It was so formless that, for me, this just meant pushing it around some. It will stick to your fingers. Form it into a rough blob, cover it with plastic wrap, and let it rest for 15 minutes.
Here I departed slightly from the recipe. The recipe says lay a well-floured piece of parchment paper on half of a cotton (non-terrycloth) dishtowel, transfer the blob of dough to the paper, and - after sprinkling with flour - fold the other half of the towel over it, tucking in the sides to make a package.
Since I was using my Silpat sheet, I kept the blob on the mat and covered it with the towel.

Let the dough rise for 2 1/2 hours.
Two hours into the rising time, turn on the oven to 450 degrees, and place your baking dish inside. The recipe recommends a large, heavy casserole or Dutch oven with a lid. I have a cast-iron enamel Dutch oven I use.

After the remaining 1/2 hour of rising time, take the hot dish out of the oven. Transfer the dough into the pot - it will be gooey - shaped roughly into a ball. If the dough falls apart, just scrape the bits up and put them all on top of the ball. My dough stayed together as a soft, elastic blob.
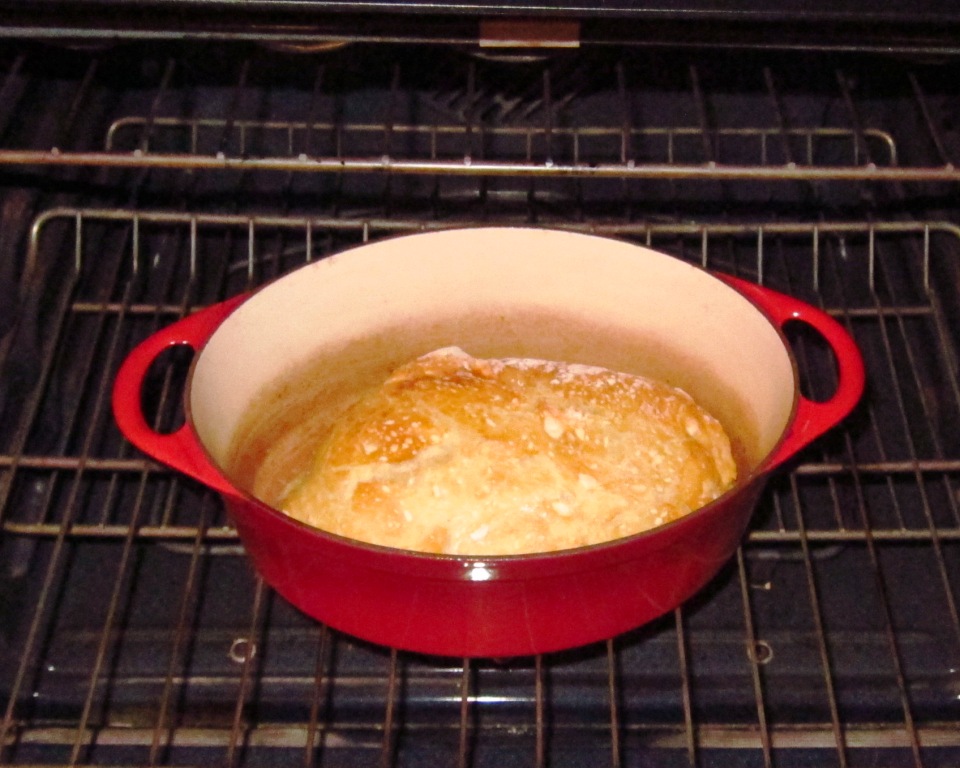
Put the lid on the dish and bake for 30 minutes. Then take the lid off and continue to bake for another 15 -20 minutes, until the crust is a golden brown.
When I took it out of the oven, I initially had a hard time getting the loaf out of the pot, but after it cooled a bit it came right out without sticking. You might want to sprinkle the bottom of your pot with corn meal - I'll try that next time.

The trick to this bread is the long, slow rising time, plus baking the moist dough inside the closed pot. The moist closed environment gives the crust that crackling, delicate quality, while the long fermentation time gives the crumb its large open structure.
If you search around the internet a bit, you'll find people who vary the basic recipe, sometimes by combining different types of flour, or by adding flavorings like chopped olives or raisins. I'm going to keep playing with it and see what I can come up with, but for now this is one of the easiest - and most rewarding - bread recipes I've ever made.
11 comments:
It looks fabulous!
Someday I'd like to try it... but the way my family eats bread, I'm afraid I'll be sticking to my bread machine and the 58-minute loaf that bakes while dinner is being made, at least for a while yet.
That looks delish. I made a ciabatta bread yesterday that shared some elements with yours: gooey dough, very little yeast, cooking on parchment paper on top of a cooking stone.
Came out pretty well for a first try. I found it at epicurious.com if you're interested.
I'll have to try yours next go.
oh MAN! that thing is gorgeous! I was making some whole wheat loaves meself lately....
I want some, Aunt Snow!
~
I have that same dutch oven...and I'm trying this recipe SOON! Thanks :-)
I've made this bread, and it really is that easy. It never lasts longer than about an hour or two around here..fresh warm bread never does!
Oh, I will have to try that tomorrow. I have a Japanese ceramic stlye pot that I think will be perfect for this..
That is a beautiful bread loaf!
I am seriously addicted to bread!! I must make this now!!!
See what I missed when I was out of town for the holidays and missed reading my favorite blogs? Thanks for guiding me back to this recipe. Looks great and I'll try it with the shallots sometime soon. Thanks!
Great recipe. The bread is gone within an hour after it comes out of the oven!
Post a Comment